
Updated September 2017
Whether you're heading off to the Caribbean, the Mediterranean, the Arctic, or any other of the world's most exciting cruise destinations, you can rest assured that you're going to come across some pretty spectacular landscapes - both at sea and on land - during the course of your trip. Naturally, you'll want to capture these in the form of photographs, so that you can show off to all your friends and family back home, and relive the amazing memories of your voyage for years to come.
Landscape photography can be deceptively tricky, however, and while it may seem like all you have to do is point your camera at the scenery in front of you and hit shoot, the reality is that it takes a little nous to properly capture the full glory of any location.
To help you out, we've put together a few tips on how to get the perfect landscape shot.
To avoid this, try getting up early to take pictures just after dawn, as the light at this time will be much softer, making it much easier to capture a smooth shot. The same goes for the period immediately before sunset, and in fact photographers often refer to these times of day as the 'golden hours'. What's more, the dramatic shades and hues that fill the sky when the sun is low can help to create a dream-like atmosphere, which really adds a touch of magic to a photo.
Depth of field refers to the area of the shot that is in focus. A picture with wide depth of field, for instance, will display the entire frame in sharp focus, while a photo with a shallow depth of field will be blurred around the edges, with only a particular area appearing sharp. To achieve this effect, you'll need to try shooting with different aperture sizes. As a general rule, the narrower your aperture, the wider your depth of field will be. So, if you want to highlight a certain spot on the landscape, try using a very wide aperture, as this will ensure that everything but the specific point you are focusing on appears slightly fuzzy.
When changing the aperture size, however, you'll also need to adjust your shutter speed in order to make sure you let in the right amount of light. Which brings us onto our next tip...
Landscape photography can be deceptively tricky, however, and while it may seem like all you have to do is point your camera at the scenery in front of you and hit shoot, the reality is that it takes a little nous to properly capture the full glory of any location.
To help you out, we've put together a few tips on how to get the perfect landscape shot.
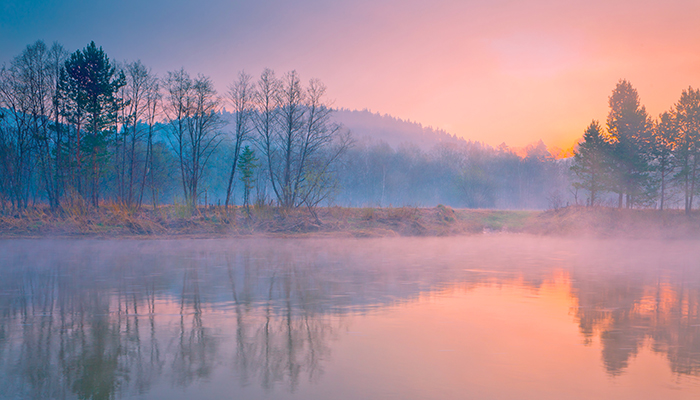
Shoot early... or late
The amount of light available will have a major impact on the quality of your shot, and very often you'll find that pictures come out looking a little flat if you shoot in the middle of the day, when the sun is at its strongest. This is because the bright light tends to cause a lot of unwanted contrast, meaning some parts of the picture will come out over-exposed while others are under-exposed.To avoid this, try getting up early to take pictures just after dawn, as the light at this time will be much softer, making it much easier to capture a smooth shot. The same goes for the period immediately before sunset, and in fact photographers often refer to these times of day as the 'golden hours'. What's more, the dramatic shades and hues that fill the sky when the sun is low can help to create a dream-like atmosphere, which really adds a touch of magic to a photo.
Experiment with depth of field
Sometimes, a picture of a landscape can seem a little boring, so it is really up to the photographer to experiment with different effects in order to highlight certain elements of the scene, and bring the picture to life. One way to do this is to play around with the depth of field.Depth of field refers to the area of the shot that is in focus. A picture with wide depth of field, for instance, will display the entire frame in sharp focus, while a photo with a shallow depth of field will be blurred around the edges, with only a particular area appearing sharp. To achieve this effect, you'll need to try shooting with different aperture sizes. As a general rule, the narrower your aperture, the wider your depth of field will be. So, if you want to highlight a certain spot on the landscape, try using a very wide aperture, as this will ensure that everything but the specific point you are focusing on appears slightly fuzzy.
When changing the aperture size, however, you'll also need to adjust your shutter speed in order to make sure you let in the right amount of light. Which brings us onto our next tip...
Experiment with exposure times
A slow shutter speed can sometimes ruin a picture, as it will make the whole thing appear blurry. However, in some cases this can be a good thing. For example, if you're taking a photo of the sea - either from the beach or the deck of your cruise ship - then by increasing the exposure time you can cause the water to appear like an eerie mist, which can add a sense of drama to the shot. Remember, though, that when shooting with a shutter speed that's less than one-hundredth of a second, you'll need to use a tripod to ensure that the camera remains still for the duration of the exposure.Obviously it will not only be landscapes that you'll want to photograph during your trip. Read our tips for photographing wildlife to increase your knowledge even further.

Back to cruise guides and features
Go